Push notification setup
Table of contents
Primer
Push notifications are sent from the server to a user’s device. On the user’s device, the app does not need to be running, or “awake”. If the device is locked, the notification will arrive on the lock screen. A tap on the notification will launch the app.
Interkit attempts to send push notifications for every Chat/Story message. It tries to avoid “unnecessery” notifications (i.e. when the user is actively using the app).
Interkit implements two ways to receive notifications:
- classic/mobile
- as used in mobile apps for years
- provided by Capacitor
- works only for compiled/native apps
- available for iOS/Android
- requires a Google Firebase Account
- “Web Push”
- uses the new-ish Push API
- uses the web-push library
- works only in Progressive Web App = PWA mode - users must install the app / “add it to home screen”, resp.
(it kind of works on some desktop browser, too, but chaotically) - this runs a service worker
- works well on Android/Chrome
- works on iOS (16.4+), with limitations:
Usually, when user receives a push notification, but the app is active/focused (visibilityState === 'visible') we do not show the notification. This does not work on iOS, due to a bug in WebKit, we believe. Once the bug is fixed, this should just work as expected. The history of PWAs on iOS is… complicated. - does not require a Firebase Account; it automagically uses gateways provided by the browser vendors
Push notifications, classic/mobile
Notes
- You need to follow all of these steps for each individual project, see also the general guide for building for native devices
- Please study the Capacitor Push Notification API docs, since we do not cover everything in this guide. E.g. you might want to look into channels, foreground/background quirks, and styling capabilities like badges, sounds…
Google Firebase Services setup
These are non-secret keys to link our app to the Firebase Cloud Messaging app instance.
- Create a Firebase account
- Create a project with apps (iOS + Android) in Firebase Console
- iOS
There is a 5 step process,- “Register App”: use your app bundle id, for example “interkit.app.starter”
- “Download config file”: download the file and put it in
ios/App/App/GoogleService-Info.plist(might have to add/drag-drop it via XCode), but do not change any code yet.
(You can download the plist file later under Project Settings › General › Your apps › Apple apps › Fooproject.)
The next might have changed since we wrote this and might not be necessary any more. - “Add Firebase SDK”: Choose version 7.11.0. You only need to add “FirebaseMessaging”
- “Add initialisation code”: Skip this step! Do iOS setup below instead
- Android
- Upon creation, you are prompted to download the credential file
google-services.json– place it inprojects/yourproject/android/app/
(A default file for the starter project is already there, overwrite it. It has to sit there, otherwise the empty app won’t run, even when push notifications aren’t used.)
- Upon creation, you are prompted to download the credential file
- iOS
Obtain APNs for iOS setup
- Go to your Apple Developer Account
- Generate an APNs key (Apple Push Notification service) there (https://developer.apple.com/account/resources/authkeys/list) Note: A maximum of 2 keys are allowed per Apple Developer Account, a key is supposed to serve “all your apps”.
- Plug it into Firebase Console: Project Settings › Cloud Messageing › Apple app configuration › Apple apps › Fooproject › Upload…
Install the plugin
cd projects/yourproject
npm install --save @capacitor/push-notifications
npx cap sync
Android setup
Not much else to do, but please also read “iOS setup” below and read the linked guide, it is helpful.
iOS setup
- Do not follow the API docs mini-guide
- Do not follow the SDK guide on Firebase Console
- Do follow the Capacitor/ionic guide
- but make sure you’re on
v5 - Ignore the ionic and Angular bits, especially “Using the Capacitor Push Notification API” - this has been taken care of.
- You can start at “Creating a Project for your App on Firebase” - there is a bit of overlap with our guide above.
- Crucially, follow the CocoPods and AppDelegate bits:
#(XCode)/Pods/Podfile

#...
target 'App' do
  capacitor_pods
  # Add your Pods here
  pod 'Firebase/Messaging' # 👈 add this line
end
#...
Then npx cap update ios to update new Pods. This might take a minute.
// projects/yourproject/ios/App/App/AppDelegate.swift
import UIKit
import Capacitor
import Firebase // 👈 add this line
@UIApplicationMain
class AppDelegate: UIResponder, UIApplicationDelegate {
var window: UIWindow?
func application(_ application: UIApplication, didFinishLaunchingWithOptions launchOptions: [UIApplication.LaunchOptionsKey: Any]?) -> Bool {
// Override point for customization after application launch.
FirebaseApp.configure() // 👈 add this line
return true
}
// 👇add these two funcs
func application(_ application: UIApplication, didRegisterForRemoteNotificationsWithDeviceToken deviceToken: Data) {
Messaging.messaging().apnsToken = deviceToken
Messaging.messaging().token(completion: { (token, error) in
if let error = error {
NotificationCenter.default.post(name: .capacitorDidFailToRegisterForRemoteNotifications, object: error)
} else if let token = token {
NotificationCenter.default.post(name: .capacitorDidRegisterForRemoteNotifications, object: token)
}
})
}
func application(_ application: UIApplication, didFailToRegisterForRemoteNotificationsWithError error: Error) {
NotificationCenter.default.post(name: .capacitorDidFailToRegisterForRemoteNotifications, object: error)
}
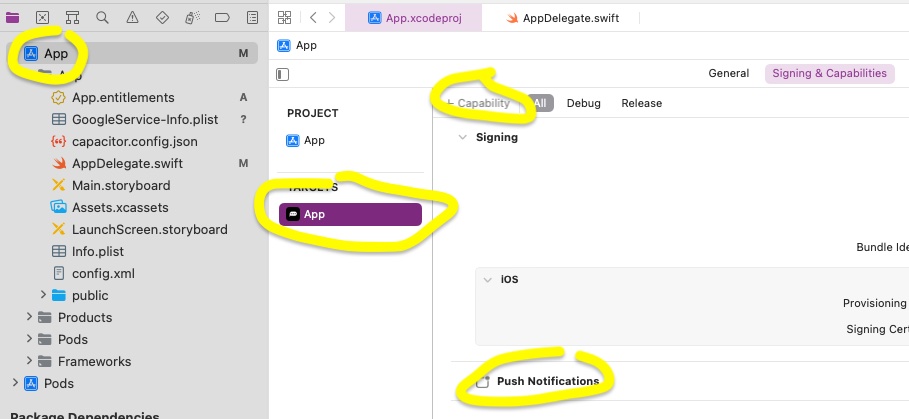
// ...In XCode, add “Push Notifications” capability. If you are missing this specific capability, check if your Apple Developer Account is “paid”, it doesn’t work for free/expired accounts.
Provide credentials
These are private keys to be kept secret, get them from Firebase Console (Project settings › Service accounts › Firebase Admin SDK › Generate new private key -> it’s ~2k of cert looking JSON). Provide them to the app:
- via Database Sheet: in a sheet named
config, with columns “key” and “value” (you just need to name the columns, the key can stay a uuid), create a row with a special keyfirebaseAdminCredentials, paste the JSON in value. - if this sheet does not exist, we check if a JSON file is present
- in a path provided by
.envvarFCM_CREDENTIALS_PATH, file namePROJECTID_firebase-admin.json, if not there, then we try - in the project folder (found via
.envREPOSITORIES_PATH), file namefirebase-admin.json.
- in a path provided by
Push notification icon on Android
(Not supported on iOS, it just uses the launcher icon)
- Create a white-on-transparent (with alpha) icon.
- The mipmap/intermediates will be 24/36/48/72/96 pixels, named mdpi/hdpi/xhdpi/xxhdpi/xxxhdpi.
Beware with pixel art! - To create the intermediates and place the files in the correct folders, you can use Android Asset Studio:
- open Android Studio, go to (the default) “Android view”. You should see the project file tree on the left
- find
app/res, right click, Create New › Image Asset - Follow the wizard.
Don’t use dash/minus in the filename, underscores are ok.
This tool will apparently scale every image, even if it is redundant/unnecessary. Do it manually to avoid aliasing artifacts.
android/app/src/main/res/drawable-[mhx]+dpi/our_icon_name.pngwill be created. Overwrite them (or create them manually at the correct dimensions in the first place).- There is also an online tool: romannurik.github.io/AndroidAssetStudio/.
- Link the resource: edit
android/app/src/main/AndroidManifest.xml, to the<application>node add this child node:
<meta-data android:name="com.google.firebase.messaging.default_notification_icon" android:resource="@drawable/our_icon_name" />
See also relevant Capacitor docs npx cap sync android- Compile, run, debug… done.
- With more effort, full-color (over white-on-transparent) might be possible, or just re-coloring/hue-ing the white icon. Consider
Firebase Docs
this Stack Overflow Q
Web Push notifications
Quick start
- Use the
AppBaseAdvancedcomponent, checkenableWebPush. AddAnonymousLoginandChat; create one (default)board1under Story.
Alternatively, start from the template06-Chat-basics, but swapAppBaseforAppBaseAdvancedand checkenableWebPush. - build, save, publish your app
- open it on a mobile device
- the OS might ask you to Allow Notifications
- add the app to your home screen (see also the
PWAHintcomponent) - launch the PWA by tapping the new icon on your home screen
- minimize the app by tapping your home button or opening a different app
- in the admin interface, under Project/Users, find your mobile user, select the row, and click the “message” button to send them a test message
- check your device to see if a message arrived
Credentials, encryption, “VAPID”
When you first launch your interkit server, it will create a key pair (private+public). (These keys secure that only your server can send push notifications to your app.)
The keys will be created by the web-push library and saved in a file,
once per interkit server, and shared by all apps within this server.
- If you do
npm run devfrom the command line, look for a filemeteor-server/webpushcredentials.json - If you’re running via Docker, this is determined by the env var
WEBPUSH_CREDENTIALS_PATH, which defaults to/var/credentials/webpush.json
Setup, customization, hacking
Interkit offers a barebones setup. To improve / hack on appearance (icon, sound, formatting) or functionality (e.g. when exactly not to show a notification), your entry points are:
- in your project
static/manifest.webmanifestfor titles etc.sw.js- the service worker which receives the Push event
(note also the commented out recipes forpushMessageto communicate withpushweb.js)
packages/interkit/pushweb.js– handles registering and the “push” subscriptioncomponents/AppBaseAdvanced.svelte– initializes clientside
meteor-server/imports/pushnotifications.js– the serverside part of message selection and sending
Troubleshooting
- Has the server created keys? (See above, “VAPID”.)
- Is your app really running as a PWA?
- It has to be served via https
- There should be no browser UI present
- Launch DevTools and check the Application tab
(this is browser-dependent and changing - search around)
- Is a Manifest present and detected? (with an Identity and an Icon etc.)
- Is a service worker
sw.jsregistered? Some browsers will let you send a push message.
- Check the logs via DevTools, they should be fairly verbose.
- look/filter for lines that start with
webpush:andSW(Service Worker)
- look/filter for lines that start with
- In the Project/Users table, find the device user, uncollapse/expand the row,
check if their object has a
webPushSubscriptionentry. It should be a string of a serialized JSON object that roughly looks like an{"endpoint":"https://...push...com/","keys":{...}}