Hello World
In this tutorial, you will learn how to create a new project that renders text onto the screen.
Create a blank project
Leave any project that is currently open and click on Create project… from the main screen.
Select the Empty option and click twice on Continue.
Give a name to your project and click Finish.
After your project is created, you will find it in the list of your projects on the home screen.
Switching between Docs and Preview
When you select the Preview tab on the top right side of the interkit workspace, you can see what your apps currently look like. Click on Preview of your project to view your app.
Use the tab bar to switch back and forth between the Docs. (If you have a setup with multiple screens, you can also open the tutorial in a separate browser window)
Now click Edit in the project list to begin making changes to your project.
Components on the App canvas
At the top of the screen, you will see the main editing sections Start, App, Data etc. For this tutorial, you will stay exclusively in the App section.
In the center of the screen you can see a canvas for assembling the user interface of your app out of components. There are already two components on the canvas by default: AppBase and StaticText.
The AppBase component ist the starting point for all interkit apps and needs to be the outermost component you add.
Use StaticText to show text on the screen. Static means that the text should not change frequently.
Change the text attribute on the StaticText component to make it say “Hello, World!” (or whatever you want).
Click Save on the top right of the canvas to confirm your changes. Your changes should now appear in the app preview.
Formatting your text
We’ll now add a third component: TextFormat. This component allows you to select predefined text styles for your text.
You will it in the component library on the left. Open the Basics section and drag the TextFormat component onto the canvas. Place it so that it is inside AppBase and contains the StaticText component. It should look like this:
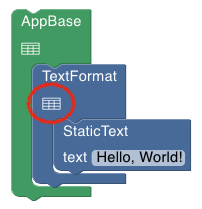
Most components have additional settings that can be configured with a menu that you can open by clicking the options table icon on the component (circled in the illustration above).
Open the settings menu for the TextFormat component and select a style you want to use from the dropdowns.
To see the effect, close the settings menu by clicking Update at the bottom, then click Save rebuild your app and see the changes in the preview.
Tip: You can get help on any component on the canvas by right clicking it and selecting Help. Try it for the TextFormat component! Use the navigation arrows at the top of the docs browser to navigate back to this tutorial.
Add spacing
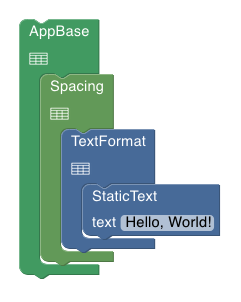
Now we’ll add some spacing around your text. Open the Layout section in the component library and drag out the Spacing component.
Place it inside AppBase and around TextFormat, like so:
Use the settings menu on the Spacing component to determine the amount of spacing, using the predefined steps. Don’t forget to save your changes to see the results.
Congratulations, you’ve complete the first tutorial!
Further Excersises
Add more StaticText components from the component sidebar.
Right click to duplicate and delete components.
Change the order of components by dragging.
Remove the Spacing block and see what happens. Put it back.
Just show me the result
If you just want to see the end result of this tutorial without building a new project, you can open the project template included with interkit.
Tip: From the Start tab, you can create a new project based on the template to make further customizations.
Next Tutorial
In the Data Loading tutorial, you will learn how to load the content of individual database cells, and load multiple rows to display them as lists, carousels or markers on a map.