Interactive Stories and Chatbots
In this tutorial, you will learn the basics of writing interactive stories and chatbots with interkit.
We assume that you have had a look at the chat quick start guide .
Orientation
A good starting point for creating your first chat application is the following template.
Before making your own copy of it, just open it and have a look around first to see what is going on.
In the preview, you should see a chat interface with a bubble saying “hello”. When you answer it, you should always get the same response: “yes”.
As you can see, there are three components in the workspace: AppBase, AnonymousLogin, and Chat.
We need AnonymousLogin to create an anonymous user account for players when they open the app for the first time. If you go to the Project tab and users, you will see a list of users that have opened the project on your server. Each time you reset the preview using the reset button on the bottom left, a new user is created.
If you open the settings of the Chat component, you will see that it references a story board, in this case board1. You will find your project’s story boards by opening the Story tab at the top.
For the rest of this tutorial, we will be working in the Story editor.
As you can see in the sidebar, there is currently one board in this project, and in it there is one node called start. Note that there is a dot on the start node. This represents the user that you are using in the preview tab of the app.
Click on the node to see what happens inside. Here you can edit what the system should say and how it should respond in the chat. The node editor provides four ways to define this behaviour.
- In the
Handlerstab, you write code for theonArriveandonMessagemethods using the Javascript Chat API, - In the
Fulltab, you can see the complete code. This is the most advanced and flexible option. - The
Stringstab is useful if you just want to change the text content in messages, and not touch the code - Finally, the Twine-ish tab is a simplified way of writing chat behaviour without using javascript. This is what we will start working with in the first part of this tutorial.
First steps with Twinish
Head back to the Project tab and click on Create to create a copy of the Chat basics project that you can edit. Now head back to the Story tab, open the node start and select the Twine-ish tab in the node editor. Click on the Twinify button. You can minify the left sidebar, as we won’t be using it for now.
You can now write messages into the editor, and they will be sent when a user opens the app. Save your changes and try it out by clicking
- the
resetbutton on the bottom right below the preview next toPublish. This will create a new user each time - the
Move preview user to nodebutton on the left in the toolbar directly above the editor. This will move the active user into the node
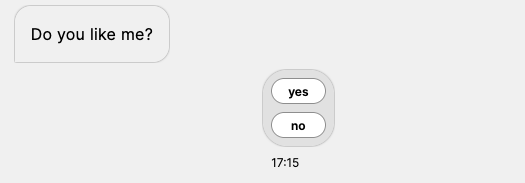
Let’s add some buttons to allow the user to interact. In Twinish, you can add buttons like this:
Do you like me?

[[yes]] [[no]]
When you save and move the user into the node, you should see something like this:
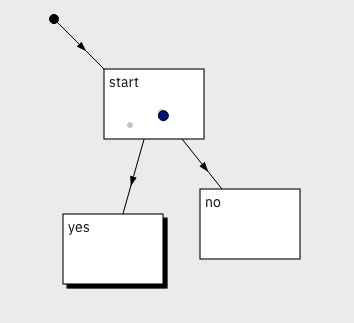
In order to define what should happen next, we need to create two new nodes, one for each option. Interkit helpfully offers buttons to do this. Below the editor you should see a dialogue “create nodes for dangling moveTos”. Press the “yes +” button, and you will be presented with the node creation dialogue. Select the Option “twine-ish, minimal” and press create. A new node named “yes” will appear on the board, with an arrow leading from start to yes. If you click back on start, you can do the same for the “no” option.
Your board should now look something like this:
Now you can select the “yes” and “no” nodes and add messages in the Twin-ish tab.
Test your chatbot by moving the current user to different nodes, or by resetting the preview to create a new user.
Have a look at the twinish reference to learn more about writing interactive stories with twinish.
Using the javascript api
interkit provides a javascript api to code advanced behaviours for your interactive stories. You can explore the javascript chat api reference to learn what commands are available.
Next Steps
For some projects, you might want to divide your story into multiple chapters or chat channels. Have a look at this template project, to learn how that is set up.
This project uses the ChatBoardsList component to present the user with a list of chat channels to choose from. These correspond to the boards set up in the Story section. In the Story seciton, each board can be customized with an Image, a title and a label. When you click on a channel in the preview, a special route is loaded that show the corresponding chat component.