Routing
In this tutorial, you’ll learn how to separate your app into different screens that can be accessed by a menu at the bottom.
Background
Each screen in your app will be identified by a unique path.
Routing is the process of selecting the correct path in response to the users actions. At every point in time, a user of your app will be on a single active route.
A good example of this are the URLs that identify websites and are displayed in the address bar of browsers.
Setting up and connecting routes
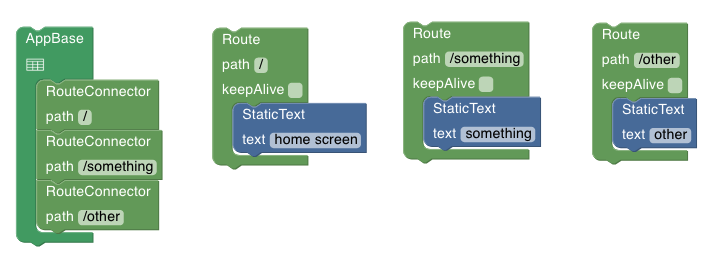
Begin with an empty project, and begin by dragging in three Route and three RouteConnector components.
All the RouteConnectors go inside AppBase, and connect the Routes to your app.
You can spread the Route components out on the canvas.
Now set up three paths to associate the Routes and RouteConnectors. For example
- /
- /something
- /other
Important: All paths must start with a ”/“. The path that is just ”/” is rendered by default when the user first visits your app.
To associate a Route and a RouteConnector component, they must have the same path.
You can now add child components to your routes. To test things out, we’re going to use StaticText components, but you can use whatever you want.
Your workspace should now look something like this:

When you save your project, your preview should show the text “home screen” and nothing else. This is because the “home screen” content is in the Route with the default path ”/“.
Setting up navigation
We currently have no way for the user to access the other two routes of your app, so let’s set up some navigation!
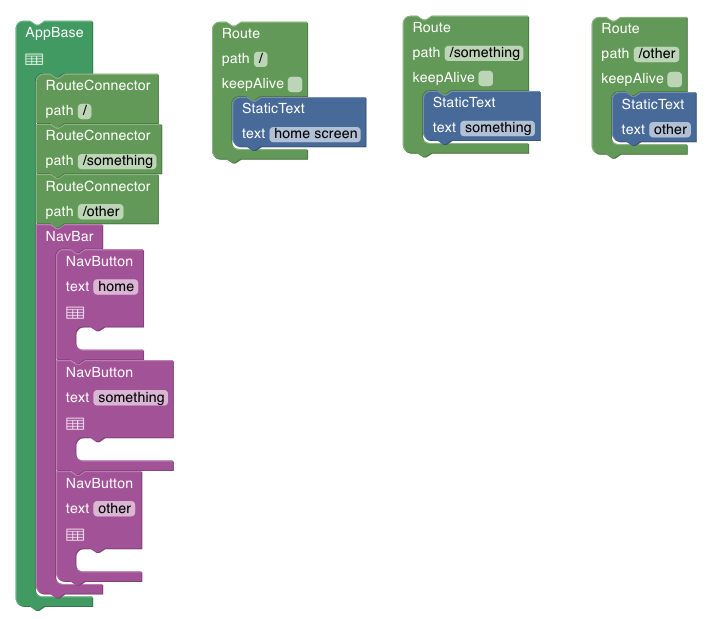
Drag in a NavBar and three NavButton components and place them under the RouteConnectors in AppBase.
Label the NavButtons by setting the Text on each of them, for example to “home”, “somethings”, and “other”.
Your workspace should now look something like this:

When you save your workspace, you can see that the preview shows a basic menu below your content, but nothing happens when you click on the buttons. You’ll need to configure each button to tell the system which path it leads to.
To do that, click on the settings icon on each button, select “route” under “effectType” and the correct path for each. One button should lead to ”/”, one to “/something”, and one to “/other”.
Don’t forget to save your workspace after changing all the NavButtons. Now you should be able to switch between the three routes.
Tip: Note that the active route is displayed about the preview. This can be useful when debugging.
Getting organised
As you can see, the navigation menu is now stuck right under the content. In order to position it at the bottom of the screen, we can use a layout shell, such as the BottomBarShell.
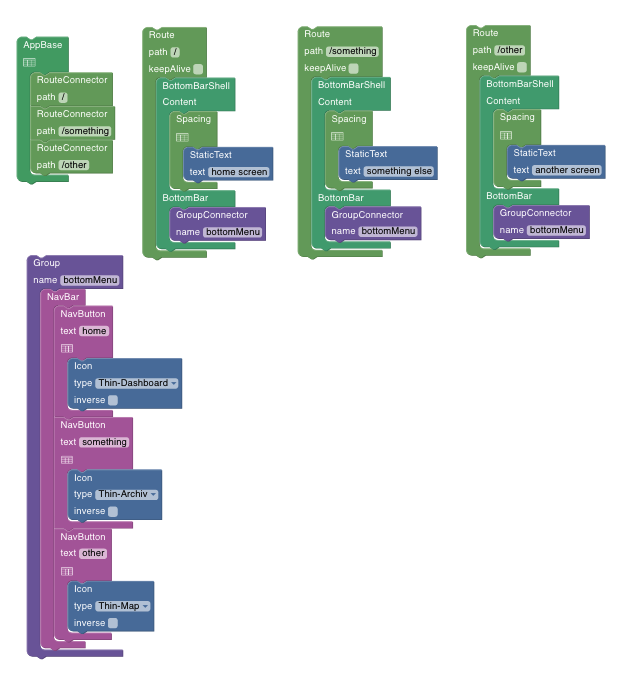
If you’re happy with using the same shell on each screen, you can place the shell into AppBase, put the RouteConnectors in the Content slot and the NavBar in the BottomBar slot.
For a more flexible variation, we would like to have the layout shell in each Route, so that we can customize each route freely. But we don’t want to duplicate our menu for each Route. The solution for this is to put the menu in a Group and connect this group in each Route.
It should look something like this:

Tip: To add icons to your NavButtons, drag Icon components into the slots and select the icons you want to use.
Just show me the results.
Here’s a project template with a bottom menu:
Next Steps
Congratulations, now you know the basics of routing.
You might want to try exploring this further by placing buttons in your app that navigate to certain routes.
Also have a look at the TopMenu template, which shows you a different kind of menu using the same principles.
For more information on how to combine routing with data loading, head on to the Data and Routing tutorial. To learn what else you can do with buttons, have a look at the Button Effects tutorial.