Combining Data and Routing
In this tutorial, you will combine your knowledge about Data Loading and Routing to create a detail view for individual elements in your database.
This is a common pattern, for example when you want to allow the user to access a screen with details of an element from two places in your app, let’s say a list and a map.
Preparation
We assume you’ve had a look at the three foundation tutorials, especially those about Data and Routing.
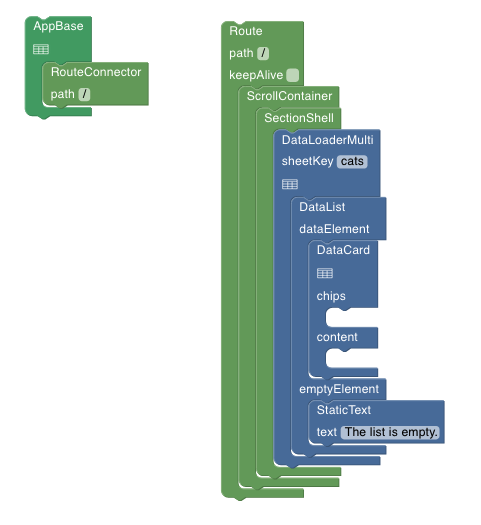
Start by duplicating Template 03-DataList.
Setting up a Route for the Detail View
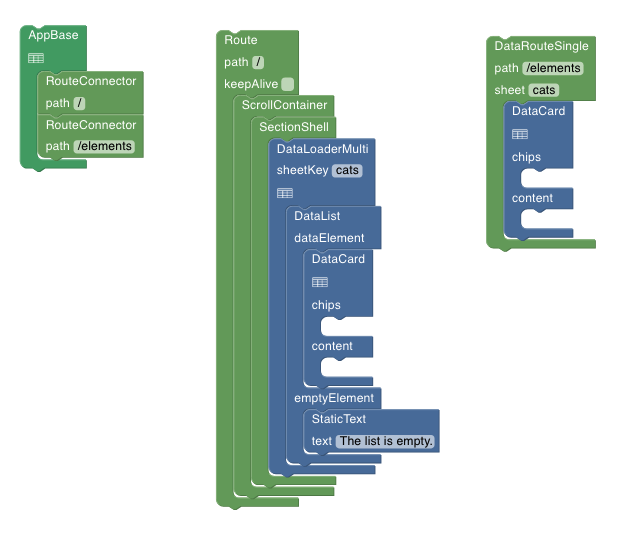
First, let’s move the components that are loading and displaying our list into a route. Drag in a Route component, and move everything that is in App base there. Add the RouteConnector and set both paths to ”/“.
Your components should look like this:
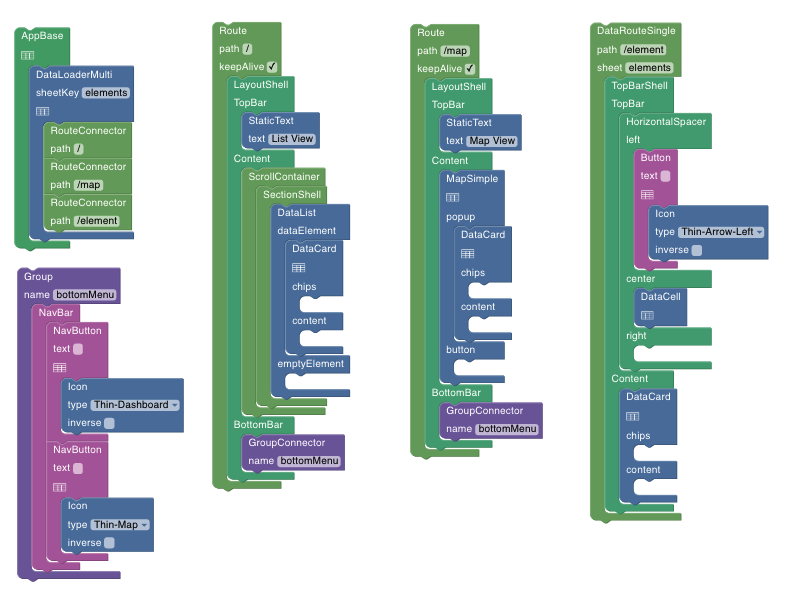
Now it’s time to add the route for the detail view. For this, we’ll use a special route called DataRouteSingle. Set the path to “/elements” and select your cats sheet as the sheet. You also need to connect your route using a RouteConnector component with the path “/elements” in AppBase.
This component now automatically creates a route for every row in the cats sheet. Technically the route is /elements/[rowKey] where rowKey is replaced with the rowKey of every row.
Let’s add a DataCard to our “/elements” route. You can use the full variant here.
In order for the user to navigate from the list to the detail view, we need to add an effect to the DataCard in our List on the ”/” route. Configure the effect on the DataCard there with type “dataRouteSingle” and path “/elements”. You can also set the variant to small and enable the rightArrow to signal to users that they can tap on the cards.
When you save your workspace, you should be able to use the list to open a detail view of each cat. But there is currently no way for the user to get back to the list!
To add a back button, add a TopBarShell with a Button inside the DataRouteSingle. Configure the Button with a “back” effect. This automatically takes the user back to the previous route.
Just show me the results (detail view)
Adding a Map
Now that you know how to creat a detail view, we can add a second way for users to access it. Let’s add a third route and display our elements on a map.
Being by setting up a new Route and RouteConnector component with the path “/map”. Then add a MapSimple component.
In order to access the map, add a bottom menu, like the one we set up in the Routing tutorial.
For the map to show anything, we’ll have to load data, again using a DataLoaderMulti component. We can reuse the same one that we already used to load the data for our list. Move the DataLoaderMulti component into AppBase, so that it loads data for all of its children.
This is roughly how it should look:
You’ll also need to add a column to your database sheet to store the location data, and configure the map to use that column to display markers.
Finally, add a new DataCard inside the map. This is the card that is shown when the user clicks on a marker. Configure the effect of this DataCard point to the same “/element” route as before. If you get stuck, load the template project below to investigate.
Just show me the results (detail view and map)
Next steps
Congratulations! You’re now ready to create advanced interfaces and display data in a variety of ways. Make sure to check out the other intermediate tutorials to branch out into different areas.